Have fun and incidentally learn Linux
Introduction:
In my last trimester at university, we covered Linux basics as part of one of the modules. As a former UNIX and Linux sysadmin for a small Managed Services Provider (MSP), this was an opportunity for me to focus on the other modules and take a trip to London to participate in a CTF. Many of the students in my class were not as familiar with Linux and I found myself asked by some of them who wanted to learn, where they should start. In my opinion, the only way is to get hands on experience. Not everybody is comfortable installing Linux and using it as their main system and they don’t have to. The recommendation I would normally make is to install Virtual Box or VMware and run a Linux distro like Ubuntu. This allows you to take snapshots and then blow away your system in spectacular style and then just revert to the snapshot you took just beforehand. All the while your host OS is safe from your learning curve along with your personal data and that report that is due by next week!
But this tutorial is on Amazon Web Services (AWS). I noticed that some of the machines being used by other students were seriously constrained in terms of CPU power, Memory and Storage capacity. This is a guide for those who find running virtualization software to be an obstacle. It is also a guide for anyone who wants to start using AWS. For this tutorial, I will show how to use the AWS GUI on the website but as you use AWS more and more, you will want to learn about the CLI and get into automation by the time you do this in production. This tutorial will cover the provisioning of a Linux server on AWS, enough information to secure your instance so it is a learning environment for only you and not a crypto mining bot for every opportunistic skid. Finally, it will cover logging in for the first time. Actually learning Linux and the vast AWS platform in full is left as an exercise for the reader.
Tutorial:
Create an AWS account and find Ubuntu AMIs
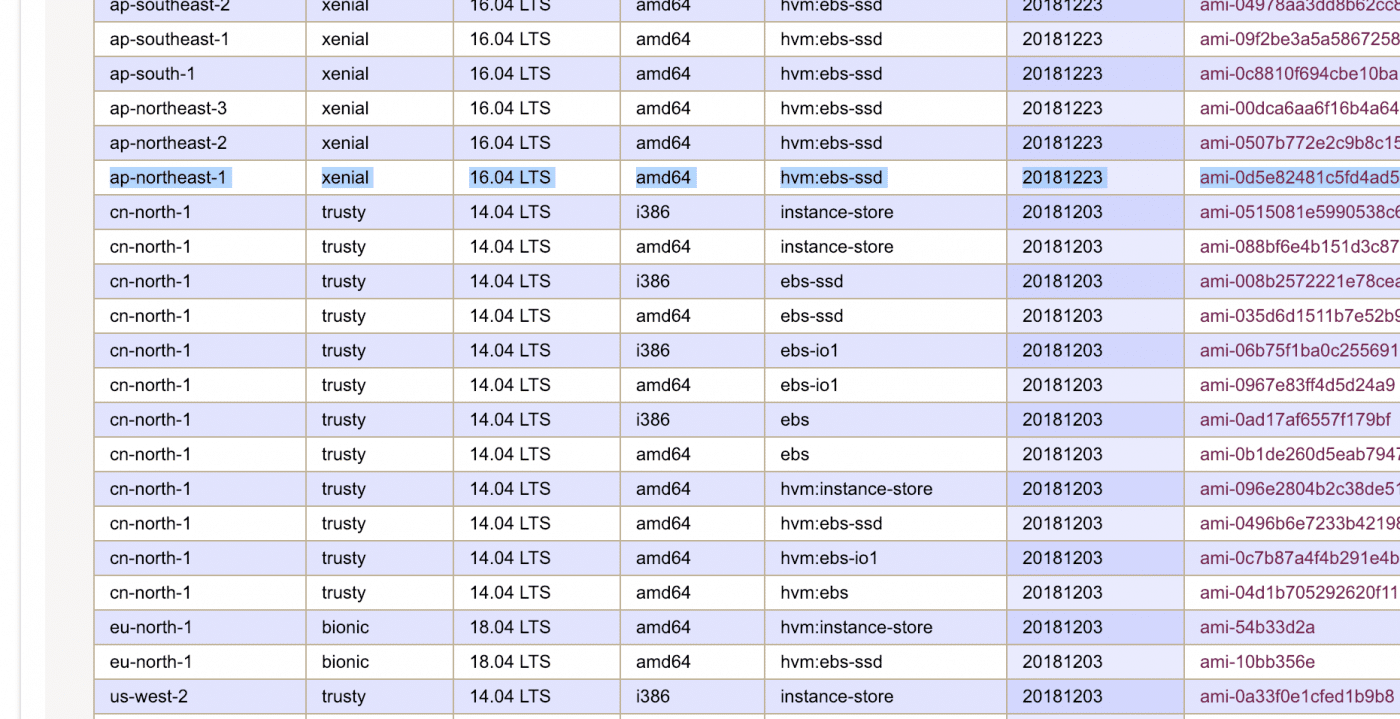
Go to: http://console.aws.amazon.com to create or login to your account. If you are an eligible student and maybe even if not, you should be able to complete this tutorial for free. Once you have logged into your account, the first step is to find the AMI. An AMI is an Amazon Machine Image, basically the template for your instance. For this tutorial I will use Ubuntu because I feel like it is probably the easiest distro to start with. At the time of writing, for my region AP-1 (Tokyo) the latest suitable AMI was: ami-0d5e82481c5fd4ad5. The parts to look out for are the region, the newest available version of Ubuntu, amd64 (for 64 bit version) and the use of hvm:ebs-ssd.
Choosing a region
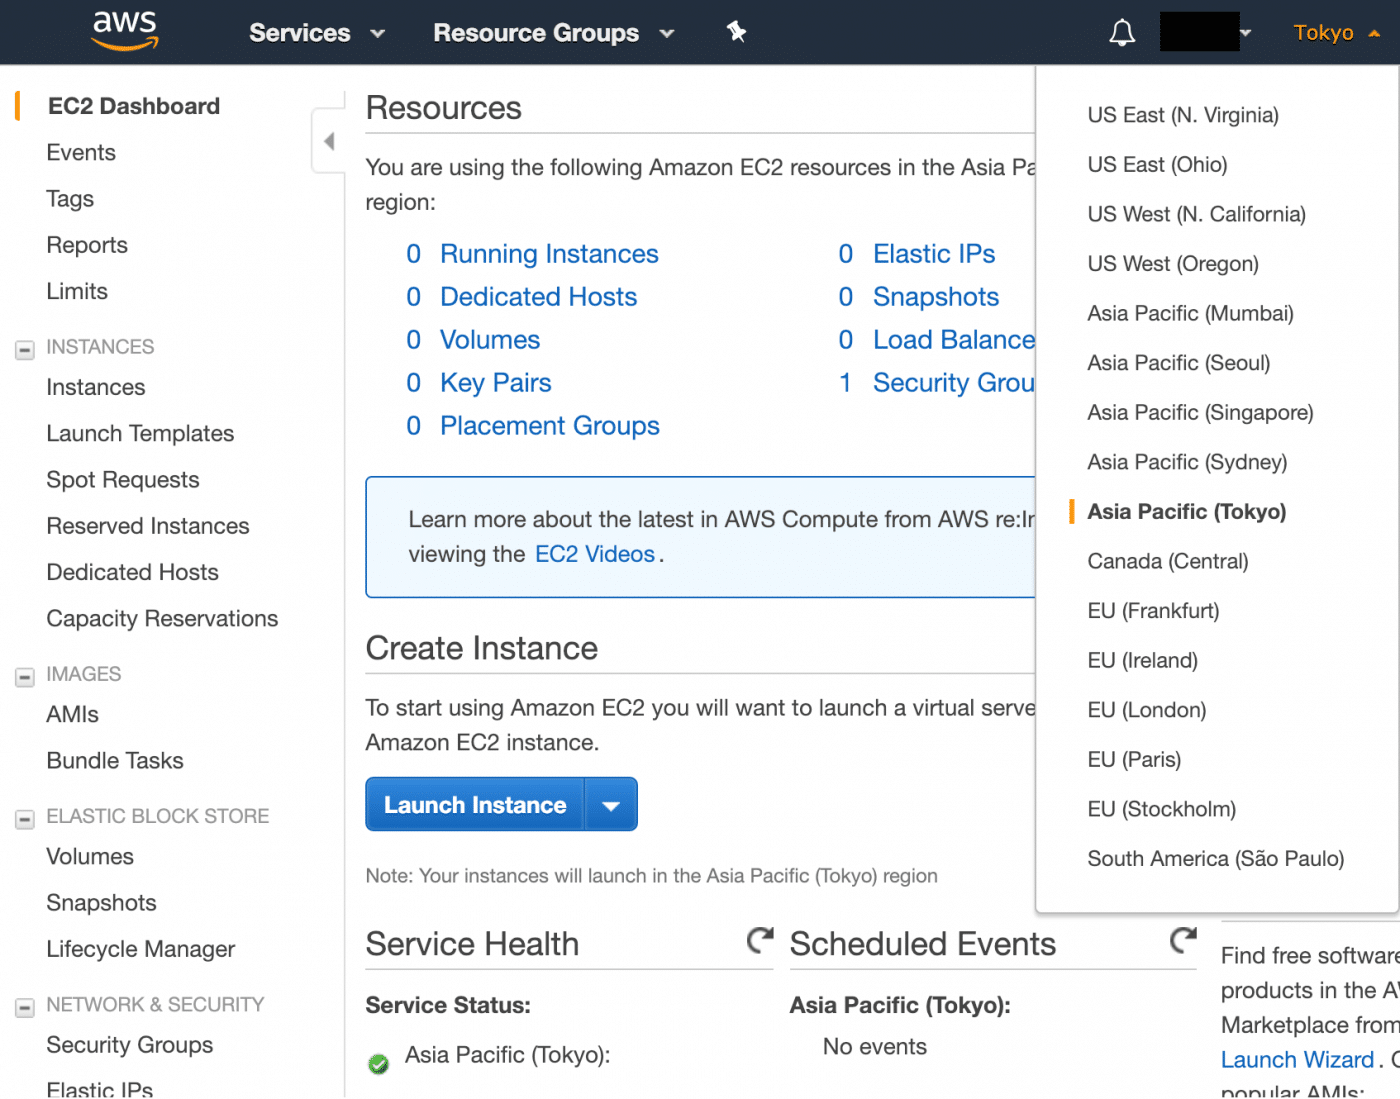
Head over to the Elastic Compute Cloud (EC2) service dashboard and choose your region. In production, you probably want to choose the one closest to your target audience or use a CDN. For this it doesn’t really matter but the one closest to you would be a good choice. The goal is to reduce latency to try to get the smoothest experience. I will choose Tokyo because I don’t currently have any instances there.
Choosing an AMI
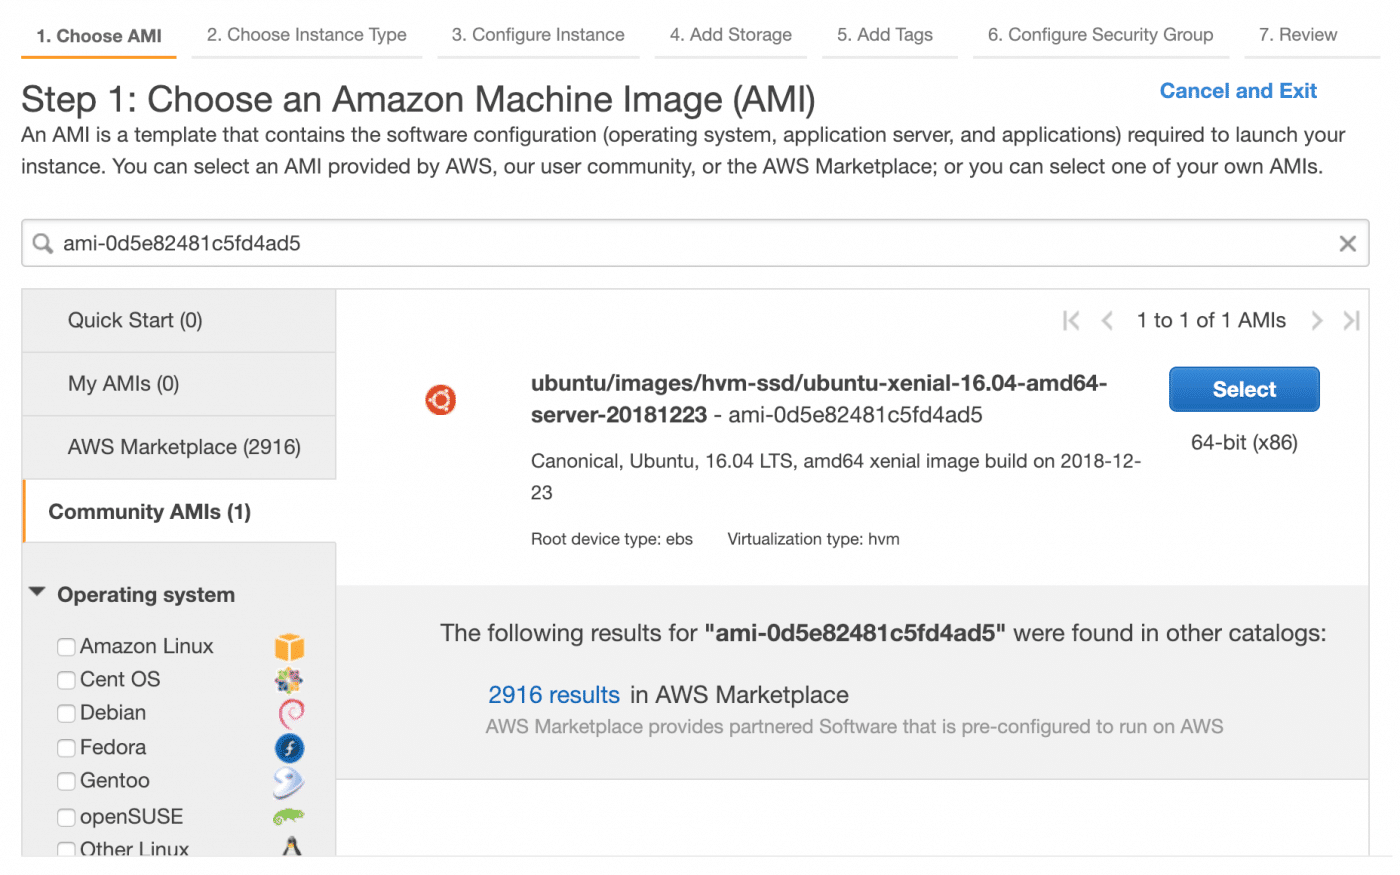
Search for the AMI you want to launch a new instance from. You should find the Ubuntu AMI in the community AMI section.
Getting the correct AMI
Select the AMI, you will probably want to use one with an ‘ebs’ root device and ‘hvm’ virtualization (at least for this tutorial).
Instance types
Next, choose the instance type. There is an impressive range of instances, we will choose a t2.micro because it is free tier eligible and 1GB on memory and a single CPU is plenty for this.

Instance configuration
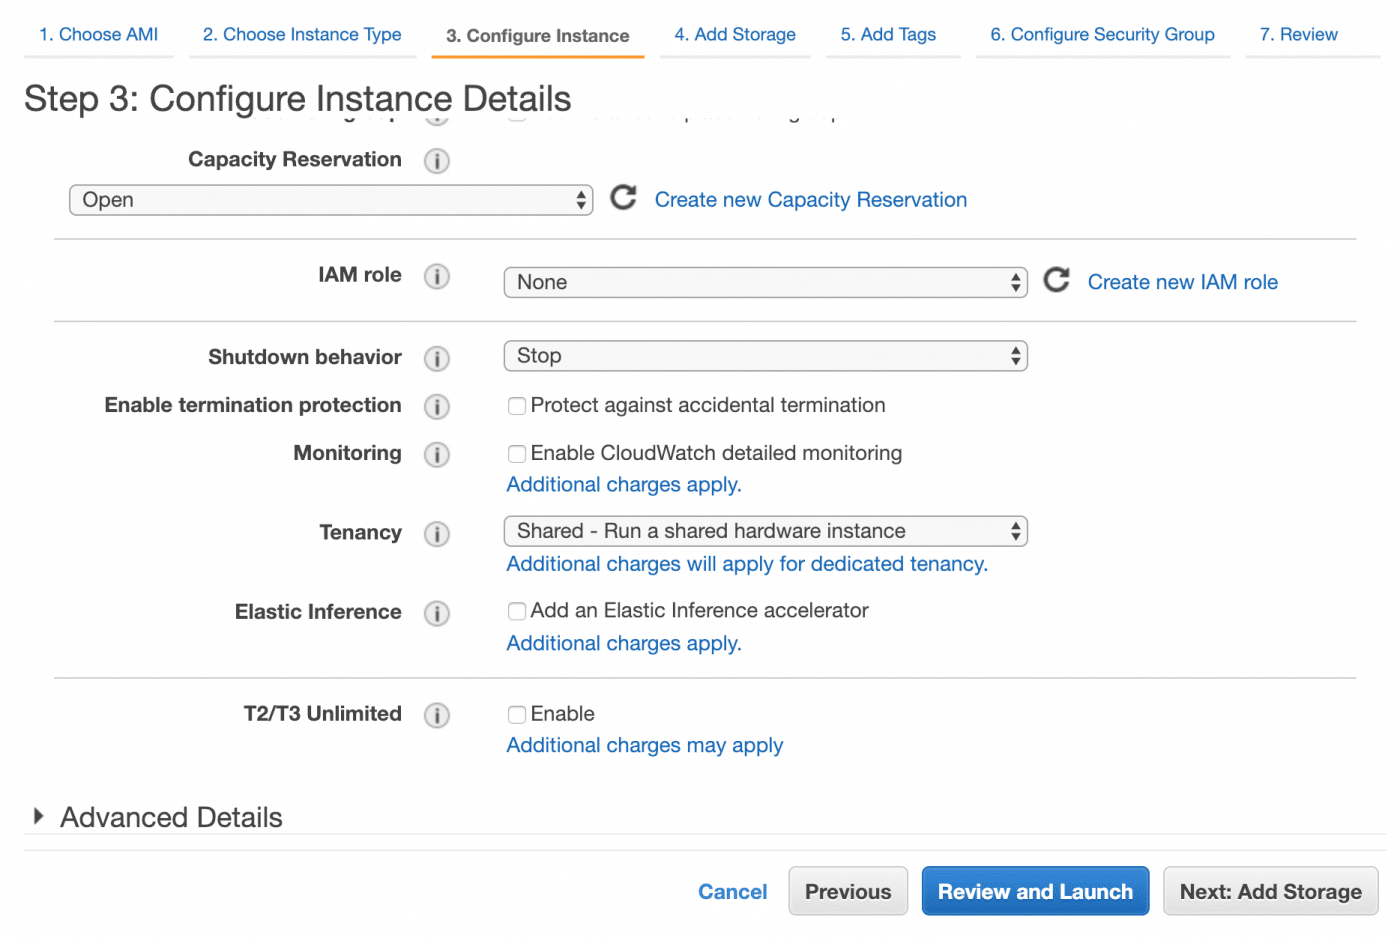
We now need to configure our new instance. There are myriad configuration options including setting up monitoring which is very useful when using AWS in production but for this, we are not going to need to change anything.
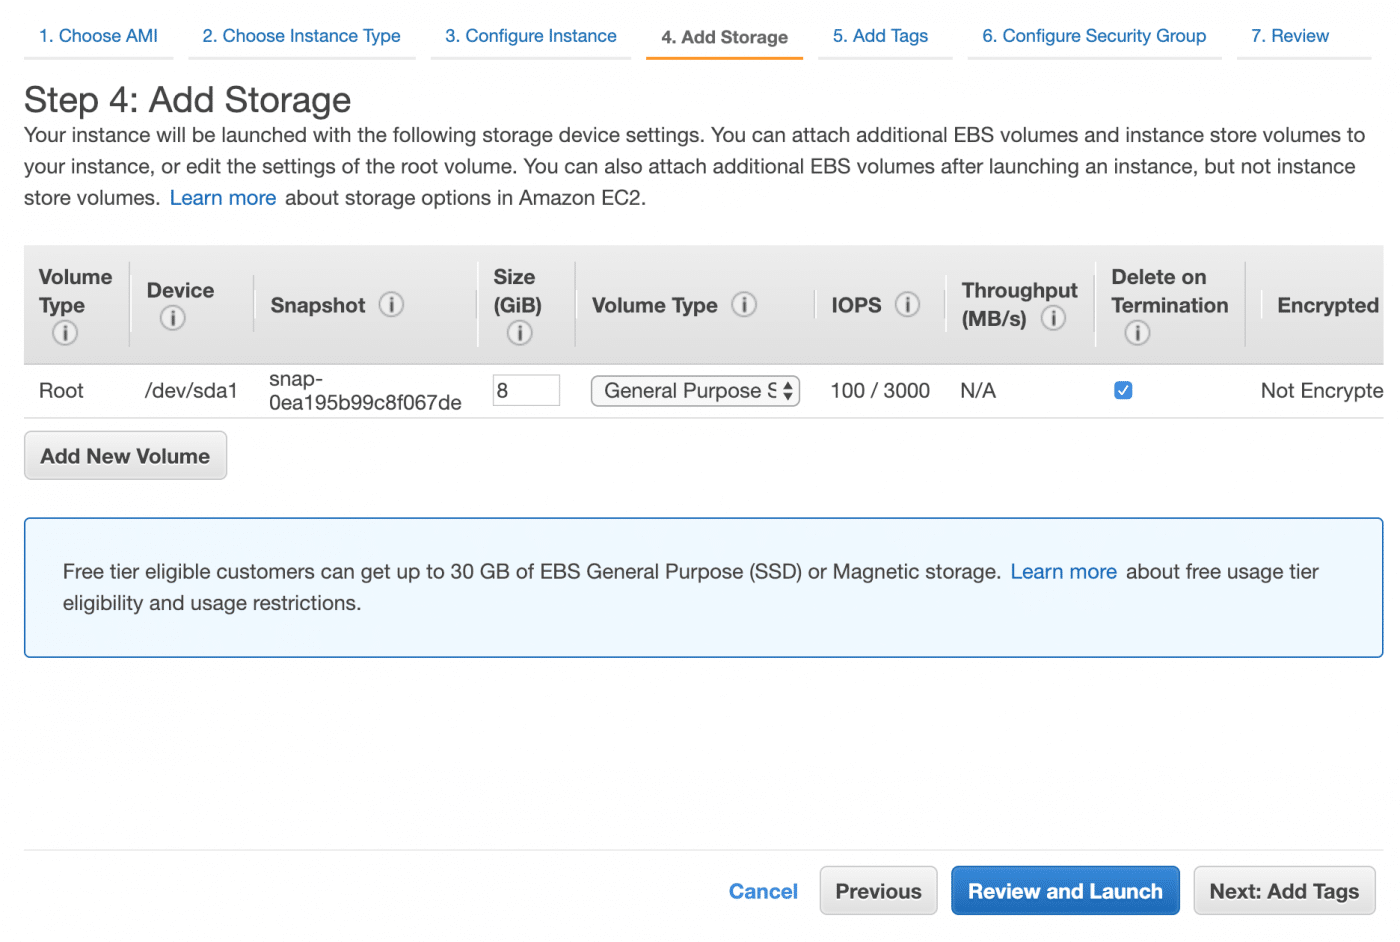
Instance storage
The next step is to add storage. 8GB of SSD will be fine unless you intend to go wild. If you do, now is the time to give yourself a little or a lot extra.
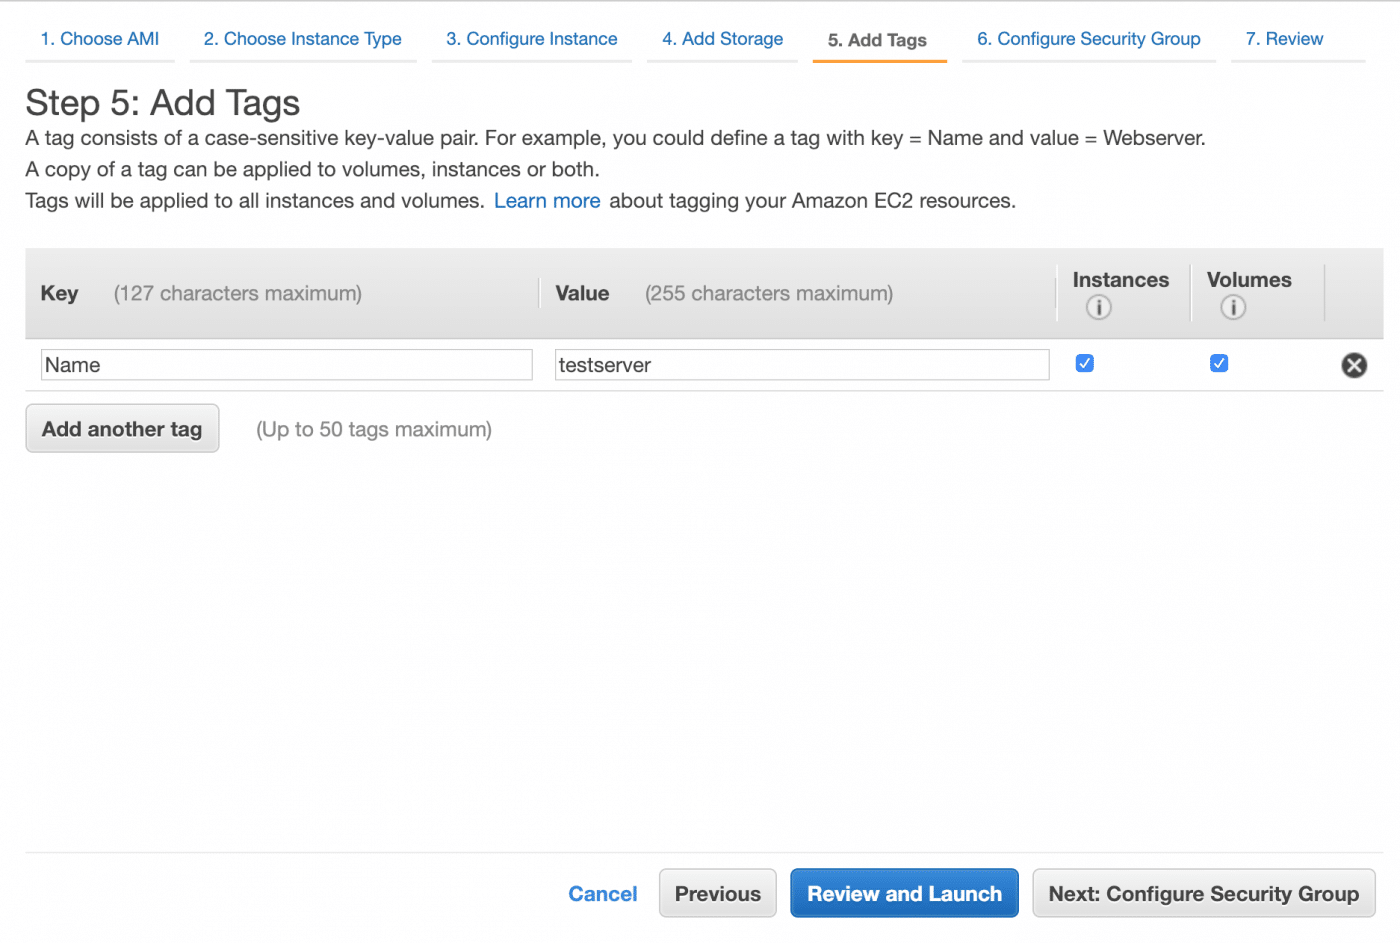
Tagging your instances
Tags are used to categorize your AWS resources. We will add only the example ‘Name’ tag to our server but you should learn more about tagging because it is important when using AWS in production.
Security
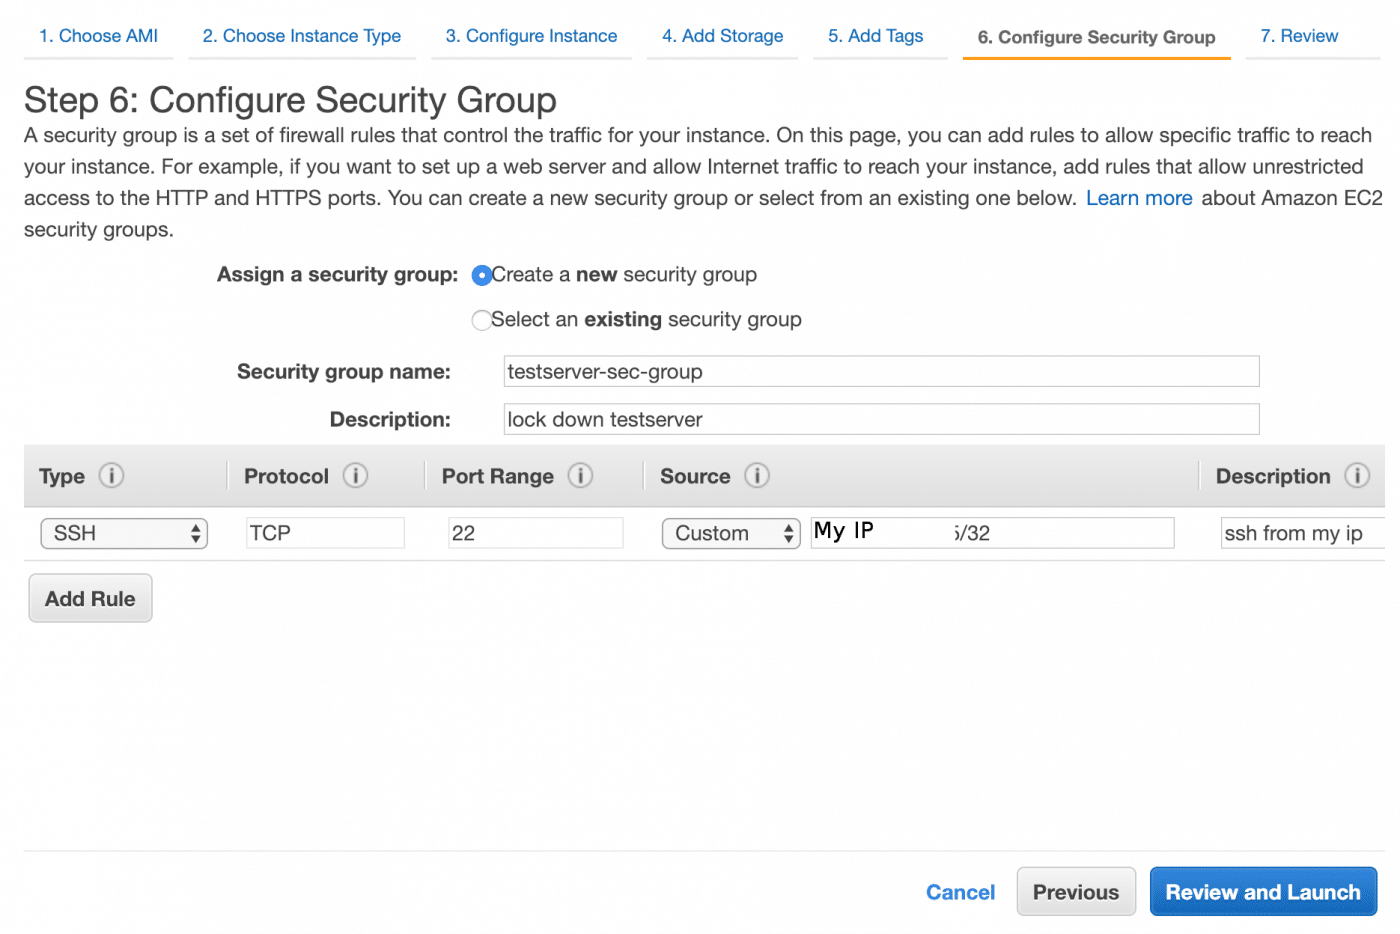
Security should always be a priority when running a server. For this project, we have a very simple policy. Nobody but you should have any access to the server whatsoever. Additionally, there will be no secret or personal information stored on the server so a compromise of the server would not be a GDPR issue. This policy is actually extremely easy to implement on AWS using security groups. Server security is out of scope for this post, I intent to cover specific topics over time but security is a process and therefore we will avoid going down any rabbit holes here. When we get to the security groups stage of the setup, we get a big warning. Good.
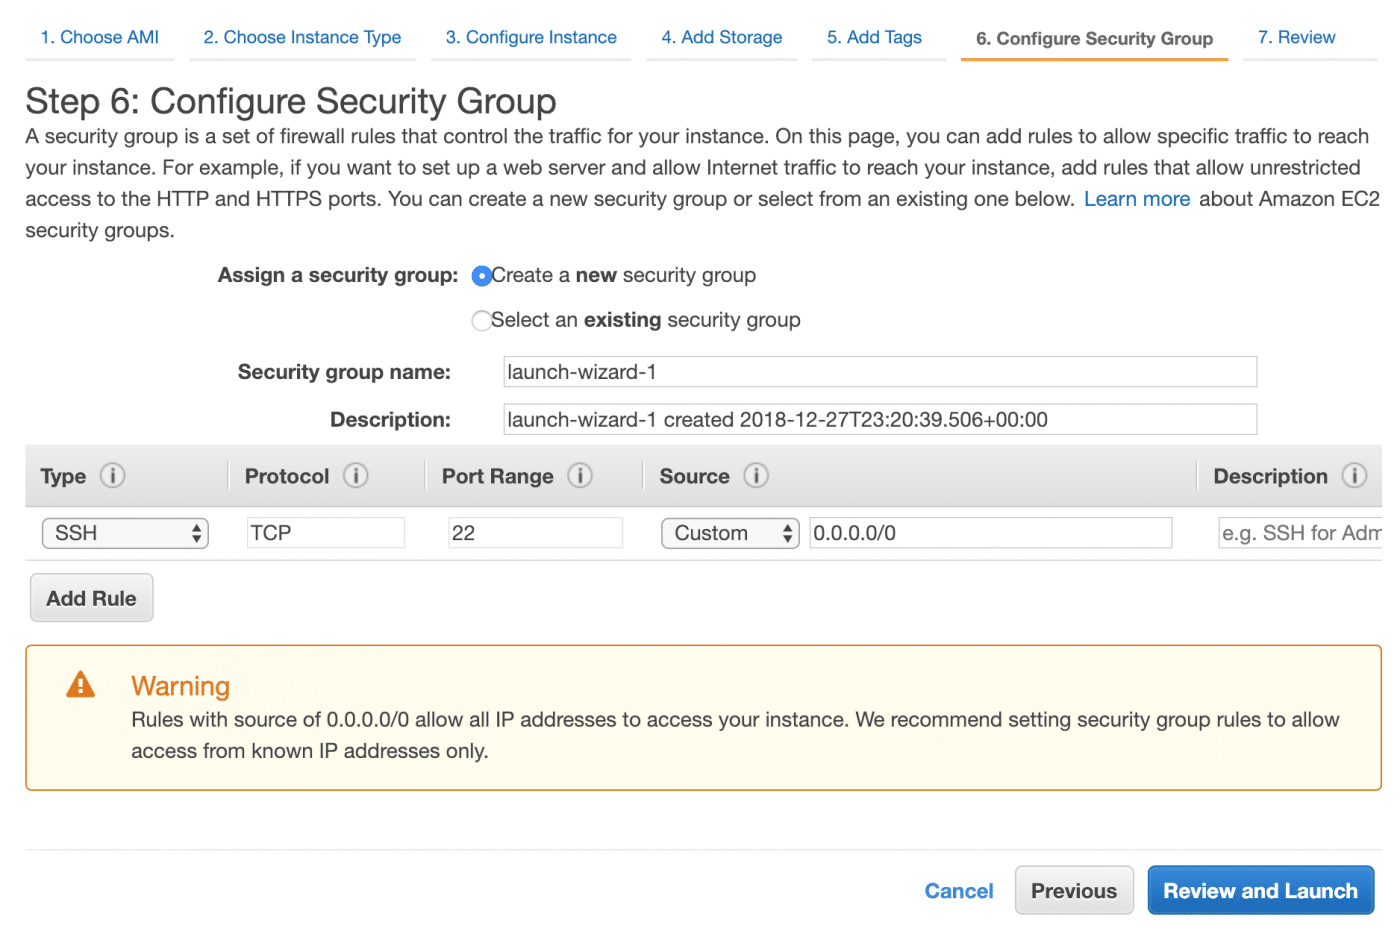
Configure security groups
The policy discussed above can be implemented by adding your IP address to an SSH rule and preventing all other IP addresses. Security groups let you define a policy based on protocol, port and source. They are basically firewall rules which can be assigned to a range of instances and save you having to set up a host based packet filter. First of all Google ‘my ip’ to find out your IP address. Paste your IP address into the source and append /32 because the source must be in CIDR notation and for an IPv4 address, /32 refers to a single IP address.The process is described in great detail here including IPv6 if you have trouble. There is no point in me rewriting the AWS documentation. It is worth noting that if you don’t have a static IP address, various circumstances – for example resetting your modem – may result in a change of your IP address. If this happens, you won’t be able to log into your instance until you log into the AWS console and edit the security group to allow your new IP address.
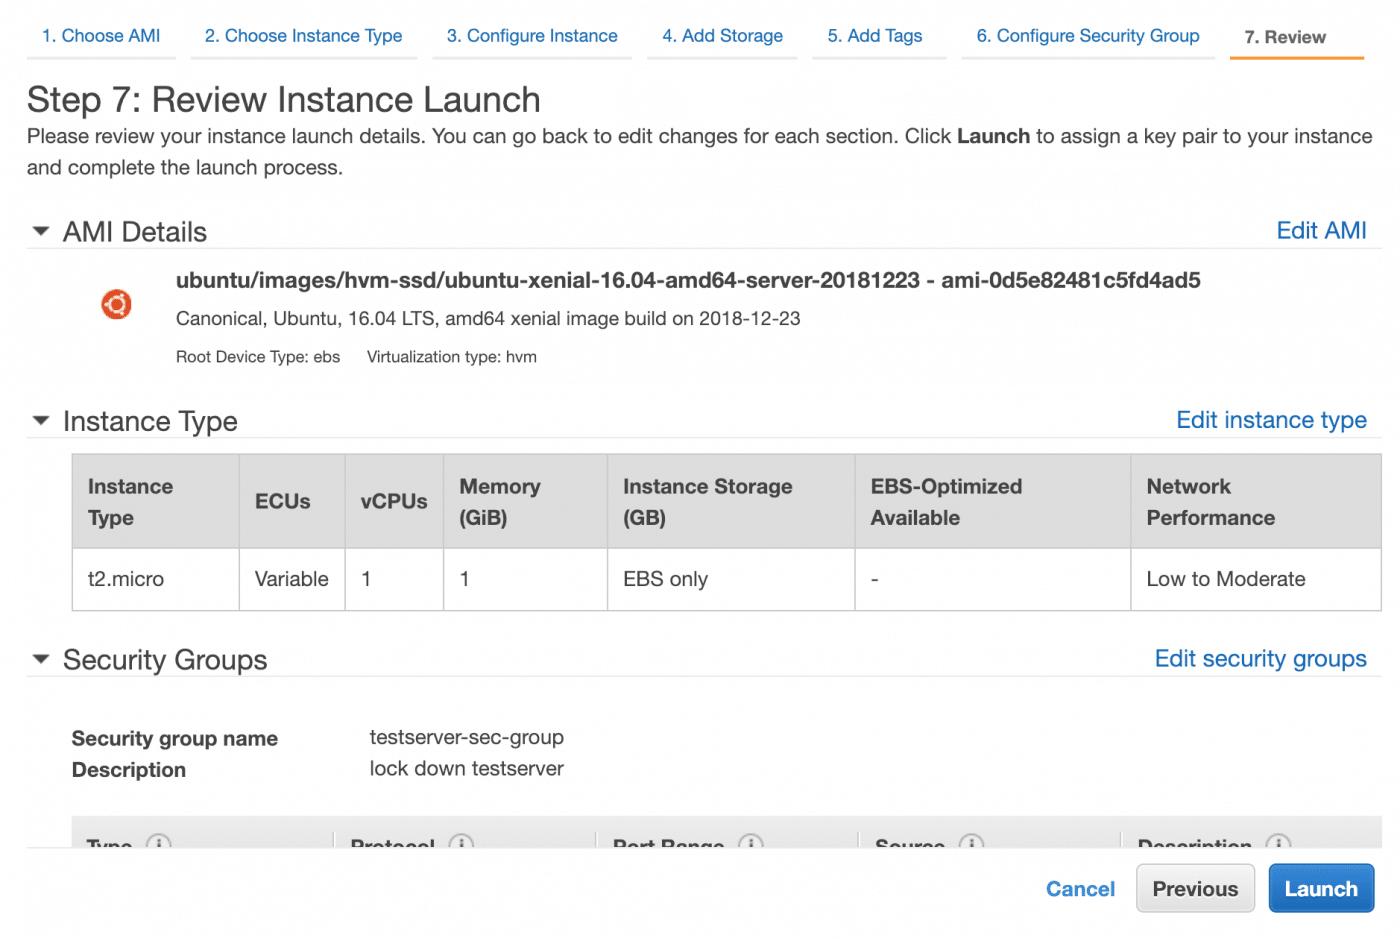
Review and launch
The other part of our security policy is very simple. Don’t upload any sensitive, personal or secret data to this instance. With the setup complete, we have the opportunity to review the instance. Launch the instance when you are satisfied.
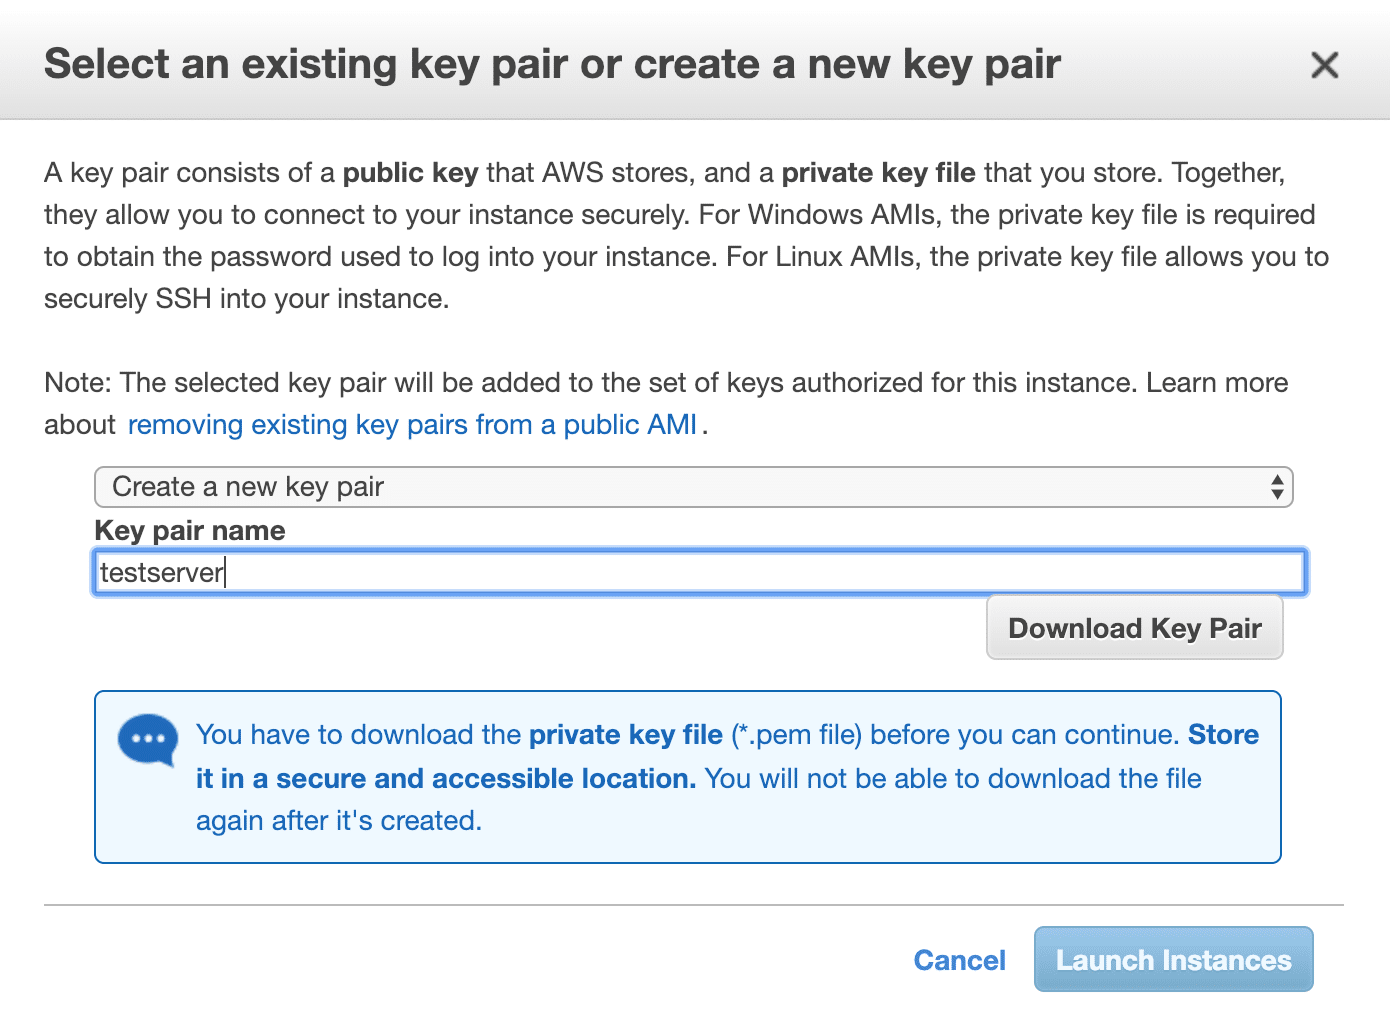
SSH key pairs
When the instance is launched, there is a prompt to download a key. As the warning says, this is the only opportunity you have to download the key. So create a new key pair, download it, verify you have actually downloaded it and then launch the instance.
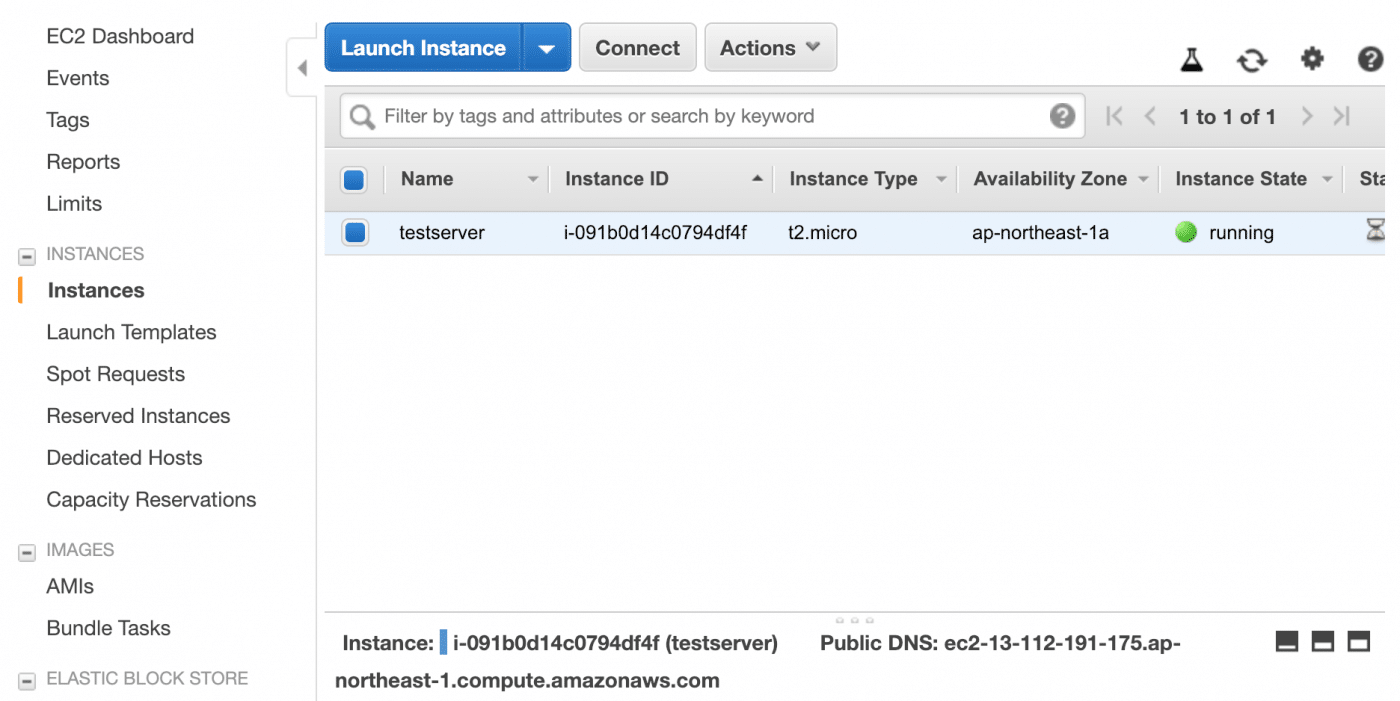
Getting up and running
Head over to the EC2 dashboard and check your running instances. Mine was already up and running but yours may still be in the pending state for a few more seconds. Wait until it is running.
Connecting from Windows
It’s time to log in for the first time. If you are on windows, at this point you will need putty. Unfortunately a detailed guide on the use of putty is beyond the scope of this post but there are a number of guides like this one which seems to cover everything.
Connecting from macOS (or other UNIX/Linux)
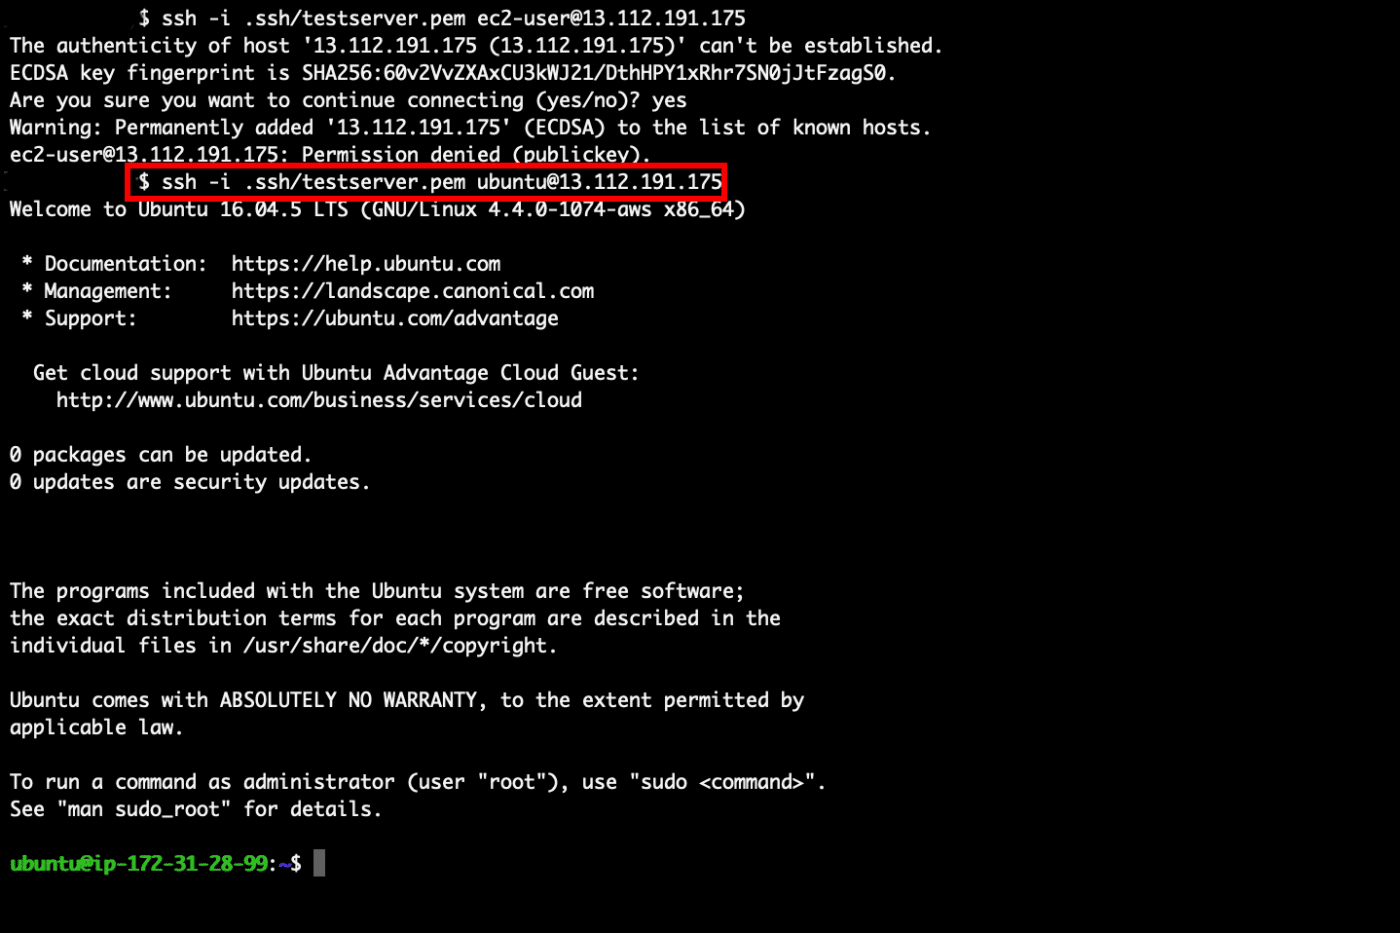
On macOS we can use SSH to access the instance. Firstly, The permissions will probably be wrong on the key file you downloaded so you should change them so only the owner can read and write while group and other have no permissions. This can be done with chmod 600 testserver.pem also, put it in your ~/.ssh directory. You can then use the command ssh -i ~/.ssh/testserver.pem ubuntu@13.112.191.175 where testserver.pem is the name of the key file you downloaded and 13.112.191.175 is the IP address or hostname of your instance. You will need to accept the fingerprint the first time you log in. If this fingerprint changes in the future, you will be prompted when you attempt to log in and it can indicate there is a MITM. In the image below, I got the username incorrect during the first attempt to log in so the first attempt failed. In this case it is not a problem, if you get an error, just check what you did wrong and do it right the next time.
Conclusion:
You now have a safe environment in which you can learn Linux commands and try stuff out without risking blowing away your own system. Even if you are a Linux user but are not familiar with the command line, it would be recommended to learn in a virtual environment away from your personal files to avoid data loss. For me, learning Linux was a fun and rewarding experience and having Linux system administration skills was instrumental in getting me my first job in IT. I hope you find the experience as fun and valuable as I did. AWS is a powerful cloud computing platform which is extremely popular in the industry. Knowing your way around it is a seriously useful skill. AWS may seem intimidating at first but there is excellent documentation and as a result of its popularity there is a huge number of people who have expertise in using it so you should be able to get answers to all of your questions. Someone has probably already asked them.