File Storage and Transfers with AWS S3
As a first year student, I had an internship at my university conducting forensics research which involved running a number of virtual machines (VMs). At the end of the internship, I was faced with two problems: firstly, I had to store the VMs and secondly, I had to transfer the VMs. I have previously introduced EC2 but I solved both of these problems by using another Amazon Web Services (AWS) product: Simple Storage Service (S3). In this post I will briefly discuss the tradeoffs of different solutions and then demonstrate how to configure an S3 bucket along with an IAM user with a restrictive set of permissions, using IAM policies applied to a user or group.
Suitability of Other Solutions:
I considered a number of alternatives but none of them compare well to S3.
USB Storage
While USB drives are a reasonable choice for local backups, they are not a resilient, long-term solution because they are prone to silent data corruption and don’t handle large files well. They also are super inconvenient for transferring files because the physical drive must be present.
File Server
A file server is a great solution for long term file storage. ZFS can detect and automatically recover from silent data corruption and failed disks and is capable of scaling well. However, it can’t solve the transfer problem well. File share protocols, such as SMB and NFS are insecure and SFTP is hard to restrict. Backups are also a concern because it’s just a single physical machine so while this solution is already prohibitively expensive for most students, a backup, preferably in another geographic location, is required for resiliency.
File Sharing Services
File sharing services such as Google Drive are convenient for sending files that are too big to attach to an email or backing up a small amount of data. A certain amount of storage is free and responsibility to secure the data is shared so you are responsible for securing your account and the provider is responsible for ensuring its availability. It’s also easy to set up and configure, making it a strong choice. However, it’s also comparatively inflexible, expensive, and the web interface isn’t suited to large transfers. Furthermore, I don’t want to sign into my Google account, and sharing with other people can be invasive to privacy.
AWS S3
With S3, you pay for what you use (bandwidth/storage) and AWS is responsible for its availability. S3 also has granular controls over access to the objects (files etc) and buckets (containers for storing objects) via IAM. And the AWS command line is a robust solution for very large file transfers. Finally, using S3 is a great excuse to upskill in cloud which is essential for anyone currently working in tech.
Set Up An S3 Bucket
This tutorial will use the AWS console to set up an S3 bucket and configure a IAM user to interact with it as permitted by a permission policy.
Create The Bucket
- Search the AWS console for S3

- Create a new bucket

- Name your bucket. We leave the rest of the defaults alone for this demo.

Create IAM User
Now that you have an empty bucket, we need a user to interact with it. Search for IAM and then select users.
- Create a new user

- You’ll have the option to add the user to a group. Groups are a much more scalable way to assign permissions. Consider for example a large organization where an employee moves from one department to another, or the organization restructures and a division takes on another’s responsibility. Groups allow you to apply a permission policy to multiple users. They are superfluous in the use case in this blog post so I will leave their configuration as an exercise to the reader.
- Review your new user. The user will have no access or permissions. You can add tags if you like.
IAM Permission Policy
- Now we need a permission policy to allow us to interact with the bucket. Still in IAM, go to policies. We will use the visual editor to demonstrate a small selection of permissions. I want to be able to list all of my buckets, list the content of the
firexflyblogbucket and upload and download objects in thefirexflyblogbucket.- List permissions:

- Read permissions:

- Write permissions:

- List permissions:
- We also want to limit the permissions we just set to the
firexflyblogbucket and the objects it contains. You achieve this by specifying Amazon Resource Names (ARN) as follows.

- Bucket ARN:

- Object ARN:
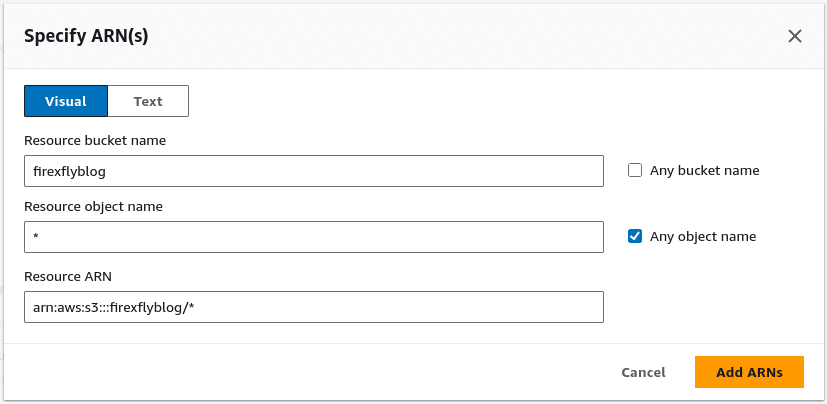
- Bucket ARN:
- Review and create the permission policy:

- Apply the permission policy to the user. Go to the IAM user, in the permission policies section, add permissions from the dropdown and select apply permission directly. Now apply the policy you created.

The JSON Editor
While we used the visual editor to create our policy, the JSON editor gives some additional insight into how the policy works. Lets review the JSON editor for the policy we just created to peer under the hood.
{
    "Version": "2012-10-17",
    "Statement": [
        {
            "Sid": "VisualEditor0",
            "Effect": "Allow",
            "Action": [
                "s3:PutObject",
                "s3:GetObject",
                "s3:ListBucket"
            ],
            "Resource": [
                "arn:aws:s3:::firexflyblog",
                "arn:aws:s3:::firexflyblog/*"
            ]
        },
        {
            "Sid": "VisualEditor1",
            "Effect": "Allow",
            "Action": "s3:ListAllMyBuckets",
            "Resource": "*"
        }
    ]
}
Note that the second SID VisualEditor1 is not restricted to the firexflyblog bucket because we want to be able to list all of the buckets in S3 (using the permission s3:ListAllMyBuckets).
AWS CLI
- Create an access key. In the Summary section, create an access key. Select CLI and confirm the tickbox. On the next screen, create an optional tag and then go ahead and generate the key.
- Download the key as a CSV. When you click next, you can’t get the key again later so if you forget to download it, you’ll need to generate a new one.
- Import the key. There are two things that could trip you up here. Firstly the user name needs to be added to the CSV by prepending the string
User Nameto the first line followed by a comma and then prepending your username followed by a comma on the second line. Also the file format may beUTF-8 with BOMand needs to be saved as plainUTF-8instead. Both of these will throw the same error message in the AWS CLI as shown below. Beware that if you edit the file and move the BOM (the bytes0xEF, 0xBB, 0xBF) along, you will get a similar error message that tells you it can’t find the next field in the header! The filetype appears to be plain UTF-8 in this case which makes it harder to diagnose but thecatcommand, in PowerShell, helps debug these errors because it prints the bytes.

Using S3 With The AWS CLI
The AWS CLI is well documented but I will also demonstrate the capabilities we’ve just configured.
- List buckets. The screenshot below demonstrates that you need to specify a profile in order to use the credentials you imported. You can also set a default profile if you prefer but I will specify a profile on the command line in this post. The profile will likely be the username you added to the CSV file. If you are unsure, you can check the profile file which is
%USERPROFILE%\.aws\credentials, on Windows. You can also interrogate the profile with the command:aws configure list --profile s3uploader. When I specified the profile, I was then able to list all the buckets without an error.

- List objects within buckets. The screenshot below demonstrates the permission policy we set in action – when I try to list the objects in the redacted bucket, I get a permission denied error. However, the
firexflyblogbucket doesn’t return any error – it is empty though.

- Copy files to the bucket. The screenshot below shows the command used to copy a file from the local system to the S3 bucket and then lists the objects in the bucket to show it worked.

- Download objects from the bucket. The screenshots below show an example where a text file is downloaded but instead of saving it, it is printed to the terminal (stdout). The second example creates a local file with the same name as the remote file.
- Download to stdout:

- Download to a file:

- Download to stdout:
And it’s done. You have now set up an S3 bucket in AWS, and configured a permission policy to restrict access to a IAM user.